Things to do after installing Linux Mint
Todo
Set up back up for files and system
Here is a collection of things I have done after installing Linux Mint 19 – Cinnamon edition.
During the installation
I followed this tutorial, https://linuxmint-installation-guide.readthedocs.io/en/latest/index.html
I wanted to have the root / and home /home/ installed on different
partitions so I selected the option Something else when asked about
installation type.
However, I faced issues when installing the grub (GRUB Installation Failed.
The ‘grub-efi-amd64-signed’ package failed to install into /target/.
Without the GRUB boot loader, the installed system will not boot)
The solution that I used was to create an extra fat32 partition of 512 MB
and attach to it the boot and esp flags. During the linux mint
installation process I then add to select this partition for booting linux
mint as showed in this video https://www.youtube.com/watch?v=lbJ7NFw6cG4.
Note
This time I choose to encrypt the home folder. Lets see if it becomes handy or not…
Setting up Linux Mint
Some simple modifications of the default settings:
- Disable any sounds in Settings –> Sound.
- Add an extra US keyboard: Settings –> Sound –> Layout, select English (US euro on 5).
- Add compose key to make special characters by combining different keys (e.g.
e + 'givesé): Settings –> Sound –> Layout, select Options… (Bottom right) and for Position of compose key I selected the Pause key. - Add shortcut to maximize windows: Settings –> Sound –> Shortcuts,
select Windows and Maximize window add the shortcut
Super+m(Super is the Windows key). - Set Redshift to Maintain Healthy Eyes: This function helps filter blue light which in turn, decreases the strain on your eyes. All that you need to do is launch the Redshift application (it is installed by default,) and set it to autostart (little lightbulb in the lower-right corner of the screen).
Copy important files and folders
- .bashrc (check for updates in new linux mint bashrc file)
- .vimrc and .vim/
- .ssh/config
- .git-completion.bash .gitignore_global and .gitconfig
- password.kdbx
- The Work and Document folders
Add SSH key to git
Generate a new ssh key with:
ssh-keygen -t rsa -C "pablo.baudin@epfl.ch" -b 4096
and go to https://gitlab.com/profile/keys to add the key.
Package installations
I install spotify directly from the Software Manager of Linux Mint.
With apt-get
The following packages have been installed using the command line
sudo apt-get install <package-name>:
- keepassx
- chromium-browser
- vim
- exuberant-ctags
- cmake
- python-pip
- git
” texlive-full
- For some reason I didn’t manage to install those packages with pip… python-numpy python-scipy python-matplotlib python-tk
- libpangox-1.0-0 (for vpn connection with AnyConnect)
- python-dev (required to install psutil with pip)
Python packages with pip
The following packages have been installed usinge the command line
sudo -H pip install -U <package-name>.
The -H option avoids warnings with sudo and the -U option
upgrades to the latest version.
- setuptools
- sphinx
- sphinx_rtd_theme
- h5py (for pyscf)
- bibtexparser
- psutil
Installing and set up of Mendeley
Apparently the latest version of Mendeley had to be installed by following the instruction in their website https://www.mendeley.com.
Once Mendeley is installed, the first thing to do is a sync with my online account.
Then I like to have all the pdf of the article organized in some place. I made a copy of my previous folder in
/home/pablo/Work/scientific_docs/articleswith all the PDFs. Then I told Mendeley to put new PDF files there. On Mendeley click the Tools tab then Options. In the File Organizer tab of the new window I chose the following settings: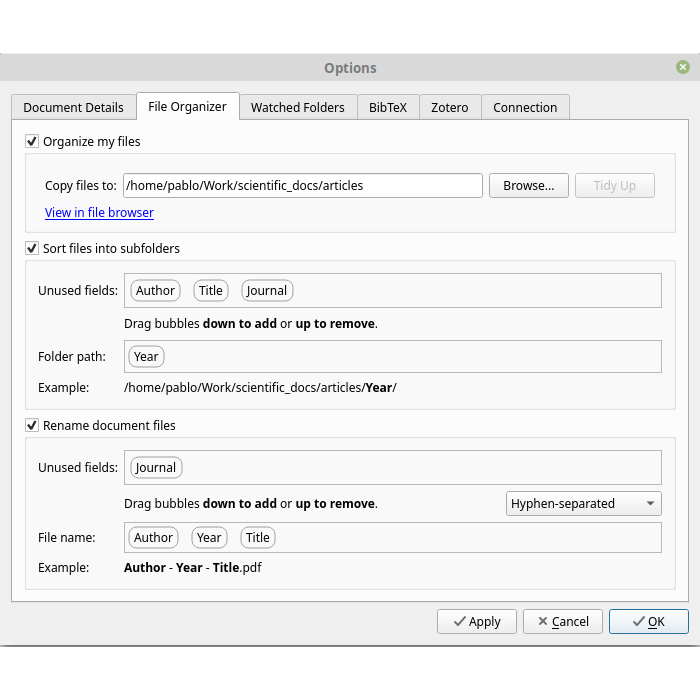
Finally, I want to have a folder being watched for new PDF files to be included in my Library. To do that I go to the Watched Folders tab of the Options window (openned in the previous step) and I selected the folder
/home/pablo/Downloads/download_papers.
Installing MKL library
Follow instructions, this time I downloaded a tar file
l_mkl_2019.1.144.tarfor linux OS 64 architectures.Unzip tar file and execute the bash script with:
sudo ./install.sh
Follow the instructions. The Linux mint OS was not recognized, I just ignored it. Everything was properly installed under
/opt/intel.Then I added the following line to my
.bashrcfile to enable the environment variables:source /opt/intel/mkl/bin/mklvars.sh intel64
Installing AnyConnect VPN client
I followed instructions from https://epnet.epfl.ch/Remote-Internet-Access, where I ended up downloading and installing AnyConnect. For it to work, I had to install a missing library (libpangox-1.0-0) as described above.
Clean up
Remove packages that didn’t install completely:
sudo apt-get autoclean
Remove your apt-cache:
sudo apt-get clean
Remove software dependencies that you don’t need:
sudo apt-get autoremove
Install printers
For the installation of the two LCBC printers I executed the following steps
- Get the name and IP addresses of the printers. For that I needed to go to
the printers and use the navigation system to get the IP addresses.
I got the following:
- Black and White Printer: HP LaserJet p4015x, IP:128.178.54.91
- Color Printer: HP Color LaserJet M553, IP:128.178.54.90
- Then, in System Settings, Printers, I first clicked on Add. Which opens a new window.
- Click on Network Printer followed by Find Network Printer.
- In front of Host: enter: http://128.178.54.91 for the Black and White printer.
- Finally I just followed the steps and use the printer name above to select the appropriate driver.